
Rib trim looks simple until a cuff grows, a waistband twists, or a neckline waves after washing. For a hoodie or sweatshirt buyer, “matching rib” is not a usable specification. The trim has to work with the body fabric, opening size, seam construction, dye route, and care process.
This guide explains the rib trim specifications that belong in a tech pack and the evidence to approve before bulk production. It focuses on cuffs, waistbands, and neck trim for cut-and-sew knit apparel rather than fully fashioned sweater components.
The quick answer: specify the job, not just “1×1 rib”
A useful rib specification identifies the knit structure, fiber composition, fabric weight or density, relaxed dimensions, finished dimensions, stretch direction, recovery expectation, color route, finish, and attachment method. It also states how the sewn opening will be measured and tested after washing.
Do not copy one rib specification across every opening. A cuff needs comfortable hand entry and reliable recovery. A waistband helps control the hem silhouette over a much wider opening. A crewneck must stretch over the head without becoming permanently loose. The same roll of rib may be suitable, but the cut length, finished width, seam allowance, and sewing control can differ by location.
| Rib location | Main job | Buyer should approve |
|---|---|---|
| Cuff | Open for the hand, then return close to the wrist | Relaxed opening, cuff height, hand-entry comfort, recovery, symmetry |
| Waistband | Control the hem and support the intended blouson or straight silhouette | Relaxed width, finished height, body-to-rib gathering, side-seam alignment, recovery |
| Crewneck rib | Stretch over the head and lie flat around the neck | Opening measurement, finished width, seam finish, stretch, wash recovery |
| Zip-hood edge or insert | Provide structure or contrast without distorting adjacent panels | Pattern shape, seam compatibility, color, thickness, and finished appearance |
What 1×1 and 2×2 rib actually describe
The names 1×1 and 2×2 describe the arrangement of knit and purl wales, not a complete quality grade. A 1×1 rib alternates one face wale with one back wale. A traditional 2×2 rib alternates two of each. Both can be produced in different gauges, yarn counts, weights, fiber blends, and finishing conditions.
CottonWorks explains that rib is a double-knit construction whose alternating face and back wales open like an accordion across the width. That extensibility is why rib is commonly used at necklines, wrists, and waistbands. It also notes that stretch yarn may be added to help the fabric recover its shape.
Visual preference still matters. A fine 1×1 rib can look clean and compact; a pronounced 2×2 rib can create a stronger vertical texture. But appearance alone does not tell you whether the trim will recover, resist growth, or stay balanced with the body fabric. Approve the exact production-intent construction.
Seven rib trim specifications to put in the tech pack
1. Knit structure and gauge
State whether the requested structure is 1×1, 2×2, or another rib, and ask the supplier to identify the production gauge or equivalent density description. A buyer does not need to prescribe a machine unless that detail is design-critical, but the approved swatch should be traceable to the bulk material.
Review wale definition, surface compactness, thickness, edge behavior, and how the rib looks next to the sweatshirt body. A heavy-looking rib that is actually loose may stretch easily but recover poorly. A very tight rib may feel firm and restrict the opening.
2. Fiber composition and elastic content
List the full fiber blend rather than “cotton rib.” Cotton-rich rib may include elastane or another stretch yarn to improve recovery. The correct blend depends on the desired hand feel, opening, processing route, and care requirements. A higher elastic-fiber percentage is not automatically better; yarn type, feed, knit setting, and finishing also influence performance.
Confirm whether the body and rib will be piece dyed, garment dyed, or matched from separate lots. If the garment will be dyed after sewing, every component must be compatible with the process. Our garment dye vs piece dye guide explains why the full assembled sample should be approved.
3. Weight, thickness, and hand feel
Record the nominal rib weight when it is controlled, but do not use GSM as the only selection criterion. Two ribs at the same weight can feel and perform differently because of yarn, stitch density, elastic yarn, and finish. Compare the rib with the intended body fabric as a system.
A substantial fleece body may need a trim that visually and mechanically balances its bulk. A lighter French terry can need a softer edge. Use the hoodie fabric weight guide and our French terry vs fleece comparison to define the body fabric before approving the trim.
4. Relaxed and finished dimensions
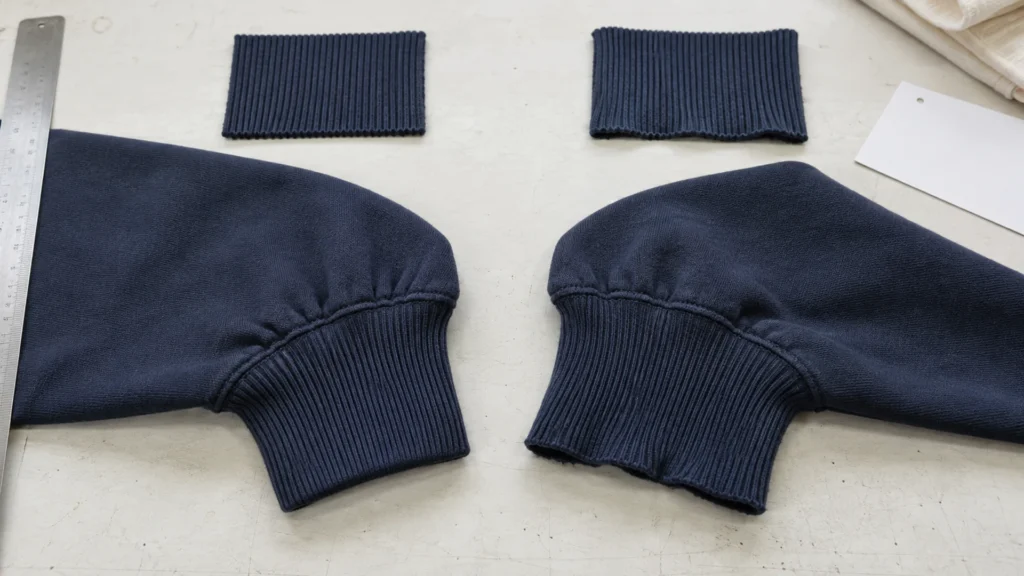
For each location, specify the measurement method and whether the value refers to the cut component or the finished sewn garment. Useful fields include rib cut length, cut height, finished height, relaxed opening width, seam allowance, and circumference where applicable.
A single universal “rib ratio” is risky because fabric stretch and recovery vary. The required cut length is a development result, not a fixed percentage that works for every hoodie. Ask the pattern maker and sewing team to establish the ratio with the actual body and rib, then lock the approved dimensions after the sample lies flat without tunneling, excessive gathering, or flare.
5. Stretch, recovery, and growth
Stretch describes how far the rib extends under a defined force or procedure. Recovery describes how closely it returns after the force is removed. Growth is the residual extension that remains. A trim can feel very stretchy in hand yet still grow during wear, so a simple pull test is not enough for an approval that matters.
ASTM D2594/D2594M covers measurement of stretch and fabric growth for certain knitted fabrics under stated procedures. The standard also explains scope and precision limitations, so buyer and supplier should agree on the applicable test method, load, timing, conditioning, and acceptance limit rather than exchanging an unexplained percentage.
6. Attachment method and sewing control
Specify the seam type, visible topstitching, finished seam allowance, and alignment points that matter. The rib and body need controlled feeding during attachment. Uneven tension can create ropey seams, puckering, twisting, or inconsistent gathering even when the materials themselves are acceptable.
Inspect both the outside and inside of the sample. Check that the cuff seam aligns as intended with the sleeve seam, waistband joins are positioned consistently, raw edges are fully secured, and topstitching does not restrict stretch. For crewnecks, also review the attachment details in our T-shirt neckline construction guide.
7. Color, shade, and finishing route
Body fabric and rib can look different even when the measured color is close. Their surface geometry reflects light differently, and different fiber blends can respond differently to dye. Decide whether the goal is an exact visual match, an acceptable tonal relationship, or an intentional contrast.
Approve body and rib together under the agreed viewing conditions. Include brushing, washing, softening, and other finishing steps in the production-intent sample. If the body and rib come from separate lots, define the shade acceptance process before cutting.
Approve the rib after washing, not only as a loose swatch
A swatch confirms structure, color, and hand feel, but it cannot prove how the trim will behave when sewn around an opening. Approve a complete garment after the intended wash and dry procedure. Measure the garment in a conditioned, relaxed state using the same points and method each time.
CottonWorks’ guidance on shrinkage and skewing emphasizes that dimensional performance is affected by fiber, yarn, knit construction, wet processing, finishing, manufacturing, and laundering. In practice, this means the body and rib cannot be approved as isolated numbers. Use our garment shrinkage approval standard to align the wash method and measurement record.
- Approve a labeled body-and-rib swatch set.
- Build a fit sample with the intended rib structure and attachment method.
- Record relaxed opening and finished height measurements before washing.
- Wash and dry the sample using the agreed care procedure.
- Condition the garment, then repeat the same measurements.
- Check recovery after realistic opening and wear simulation.
- Review flare, waviness, twisting, seam puckering, color relationship, and hand feel.
- Seal the approved sample and specification revision for bulk reference.
Common rib failures and what to investigate
| Observed problem | Possible factors to review | Useful evidence |
|---|---|---|
| Cuff flares after wear or washing | Recovery, growth, cut length, elastic yarn, finishing | Before-and-after opening measurements and retained sample |
| Waistband twists | Cutting direction, seam alignment, feeding, body skew, finishing | Flat garment photos, seam-position check, washed sample |
| Neckline waves | Rib length, attachment tension, body stretch, topstitch restriction | Opening measurement, inside seam photo, try-on and wash review |
| Rib looks lighter or darker | Fiber blend, knit texture, dye lot, viewing conditions, finish | Body-and-rib shade set under agreed lighting |
| Opening feels too tight | Relaxed size, available stretch, seam type, elastic content | Finished opening measurement and functional fit check |
These are investigation paths, not automatic diagnoses. Changing the elastane percentage may not solve a problem caused by sewing tension or an incorrect cut length. When a sample fails, change one controlled variable where practical and repeat the same evaluation.
Rib trim RFQ and approval checklist
- Garment type, target fit, size range, and base sample size
- Body fabric construction, composition, weight, finish, and dye route
- Rib location: cuff, waistband, neckline, or other panel
- Rib structure, gauge or density reference, fiber blend, and nominal weight
- Cut dimensions, finished dimensions, seam allowance, and measurement method
- Stretch direction, test method, recovery or growth limit, and conditioning time
- Attachment seam, topstitching, alignment points, and visible appearance
- Body-to-rib color relationship and shade approval method
- Wash and dry procedure, dimensional limits, and sample quantity
- Approved swatch, fit sample, washed sample, and bulk reference owner
Turn rib trim specifications into an approved garment
The strongest hoodie rib specifications connect material data to the finished opening. Define the visual result, document the construction, measure the sewn garment, and confirm recovery after the agreed care process. That gives the buyer and factory the same acceptance standard when bulk production begins.
Developing a hoodie or sweatshirt? Send Yinuo Apparel your tech pack, body fabric, rib reference, color plan, size range, order quantity, and target delivery window. We can review the open specification points and propose a practical sampling path.