
A knit garment can match the approved measurements and still fail in wear if a seam does not stretch, a needle damages the fabric, or the hem tunnels after washing. Buyers do not need to become sewing engineers, but they do need a construction standard that tells the factory what result to protect and what evidence will close the approval.
This guide explains knit apparel seam construction for T-shirts, hoodies, sweatshirts, and similar cut-and-sew products. It covers where common seam and stitch choices fit, which variables belong in a tech pack, and how to review a sample before bulk production.
The quick answer: specify seams by location and function
Do not write one instruction such as “four-thread overlock throughout.” A side seam, shoulder, neckline, coverstitched hem, pocket opening, and stress point perform different jobs. The useful specification identifies the seam location, material layers, seam configuration, stitch type, seam allowance, thread and needle requirements, stitch density, visible appearance, stretch expectation, and reinforcement where needed.
Approve the inside as well as the outside. A clean exterior photograph cannot show skipped stitches, incomplete edge coverage, excessive seam allowance, broken needle damage, or a bulky join that may irritate the wearer.
| Garment location | Common construction direction | Main buyer check |
|---|---|---|
| Side and sleeve seams | Overedge or overlock joining suited to the fabric and required stretch | Edge coverage, seam elasticity, allowance, no grin or broken stitches |
| Shoulder seam | Joined knit seam, sometimes with tape or another stabilizing element | Length stability, comfort, seam position, no distortion |
| Bottom and sleeve hems | Coverstitch or another stretch-compatible hem construction | Flat appearance, stretch, parallel rows, no tunneling or roping |
| Neck rib attachment | Overlock attachment with specified topstitch or coverstitch where required | Opening size, recovery, seam bulk, even feeding |
| Pocket corners and openings | Topstitching plus localized reinforcement where the design requires it | Reinforcement position, secure ends, balanced appearance |
| Skin-contact performance seam | Low-bulk seam selected for comfort and stretch | Chafing risk, extension, profile, seam placement |
Stitch type and seam type are not the same thing
A stitch is formed by one or more threads interlacing or interlooping. A seam is the configuration that joins or finishes material layers using those stitches. Two factories can use the same familiar word while picturing a different construction, which is why a drawing, cross-section, or approved sample is more reliable than a name alone.
For formal nomenclature, ISO 4915 classifies and illustrates stitch types, while ISO 4916 classifies and illustrates stitched seam configurations. A buyer can reference an ISO designation when the supply chain uses it, but the tech pack should still show the location, material layers, and intended appearance.
Common stitch constructions in knit apparel
Overlock for joining and edge coverage
Overlock constructions use needle and looper threads to join layers while covering a cut edge. They are widely used for knit side seams, sleeves, and rib attachment because the resulting seam can accommodate useful extension when correctly balanced for the fabric.
“Overlock” is still incomplete as a specification. Confirm the required construction, thread count or stitch designation where relevant, seam width, stitches per unit length, allowance after trimming, and visible thread color. On the sample, stretch the seam in its actual direction of use and inspect for thread breakage, seam opening, exposed raw edges, or fabric damage.
Where the seam attaches an elastic opening, review the component and construction together. Our guides to hoodie rib trim specifications and T-shirt neckline construction show the additional measurements and recovery checks involved.
Coverstitch for hems and visible stretch seams
A coverstitch commonly shows one or more straight rows on the face and looper coverage on the reverse. It is often used at T-shirt hems and sleeve openings because it can finish a folded edge while retaining stretch. The number and spacing of visible rows affect the look, but machine setup and feeding determine whether the hem lies flat.
Review both faces of the hem. Look for parallel rows, secure starts and ends, complete underside coverage, consistent folded depth, and adequate extension. Tunneling between rows, waviness, skipped stitches, or a hem that no longer stretches with the body fabric are reasons to reopen the construction approval.
Flat and low-bulk seams where comfort matters
Low-profile seams can reduce bulk in activewear or other close-to-skin products. The visual label “flatlock” is sometimes used loosely, so the buyer should approve the actual face, reverse, overlap or abutment, thread coverage, and seam placement. A decorative flat-looking stitch is not automatically the same as a structurally suitable low-bulk seam.
Evaluate comfort on the body, not only on a flat table. Seam position, thread texture, sweat, repeated movement, and adjacent panels all affect the result. If a low-bulk construction is a fixed requirement, include an inside reference photo and a production-intent wear sample.
Lockstitch, topstitching, and reinforcement
Lockstitch can create a clean, stable line for selected topstitching, labels, pocket details, or other controlled areas. Because a conventional lockstitch has different extension behavior from many knit seam constructions, its suitability depends on the direction of stretch, stitch density, thread, and design.
Bartacks or other localized reinforcement can protect pocket corners, drawcord openings, zipper ends, and stress points. More reinforcement is not always better: an oversized or overly dense bartack can stiffen a light fabric or damage it. Map the exact position, finished size, orientation, color, and acceptable appearance.
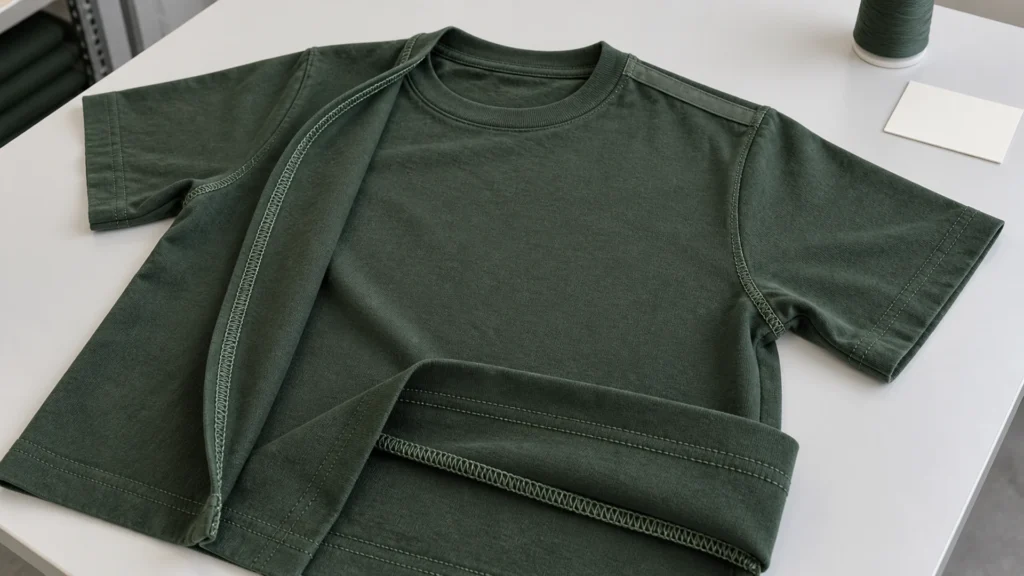
Eight variables that determine whether a seam works
1. Fabric construction, weight, and stretch direction
Jersey, rib, interlock, French terry, and fleece do not feed or extend identically. Record the production-intent fabric and the stretch direction that the seam must follow. A construction approved on a stable swatch may behave differently on a soft, open, or highly extensible knit. If the fabric is still open, our hoodie fabric weight guide explains why GSM alone cannot define the material.
2. Needle selection and fabric damage
Needle type and size must suit the yarn and knit. Holes may appear immediately, but partially damaged yarns can also reveal themselves after washing or wear. Cotton Incorporated’s bulletin on sewing cotton and blended knit fabrics discusses needle cutting, thread compatibility, and sewing precautions. Treat its recommendations as technical context, then validate the actual fabric and machine setup.
3. Thread type, size, and color
Thread must be compatible with the fabric weight, construction, needle, seam design, and finishing route. A bulky thread can dominate a light knit; a thread that is too fine for the construction can reduce robustness. For garment-dyed products, also confirm how the thread is expected to take or resist color. Specify intentional contrast rather than discovering it after processing.
4. Stitch density and seam width
Stitches per inch or centimetre and finished seam width influence appearance, extensibility, thread consumption, and fabric loading. An extremely dense seam is not automatically stronger; it may perforate or stiffen some fabrics. Record the approved range and measuring method at critical locations instead of relying on “standard factory stitching.”
5. Seam allowance and trimming control
Seam allowance influences garment measurements, bulk, edge coverage, and how much material remains beside the needle line. Specify the intended allowance at measurement-sensitive or stress-sensitive seams. During sample review, compare the sewn allowance with the pattern and construction sheet, not with an assumed universal value.
6. Thread tension and fabric feeding
Balanced tension should secure the seam without pulling the fabric into a rope, tunneling a hem, or leaving loose loops. Differential feed, presser-foot pressure, machine speed, and operator handling can stretch or compress knit layers during sewing. These are production controls, but the buyer should define the acceptable finished appearance and reject samples that hide the problem with pressing.
7. Seam stretch and failure mode
Ask what happens when the seam is loaded in the direction it will experience during dressing and wear. Does the thread break, does the stitch open, does the fabric tear beside the seam, or does the seam recover normally? The relevant test and limit depend on the product, fabric, seam geometry, and market. Avoid quoting a strength value without naming the method, specimen direction, conditioning, and failure definition.
8. Washing, shrinkage, and seam appearance
A seam that looks flat before washing can pucker, twist, or become visibly uneven when the body fabric, thread, tape, and trim change dimensions differently. AATCC TM88B is designed to evaluate seam smoothness after home laundering across washable fabric constructions. If a formal method is not required, buyers should still define a repeatable wash, dry, conditioning, and visual-review procedure. Pair it with the measurements in the garment shrinkage approval standard.
How to approve knit apparel seam construction
- Map every seam location. Mark the front, back, and inside technical drawings rather than listing construction in a detached note.
- Define the desired result. State required stretch, profile, outside appearance, inside comfort, and reinforcement.
- Record the construction. Add the seam and stitch reference, material layers, allowance, width, density, thread, and color.
- Use production-intent material. Approve seams on the actual fabric, rib, tape, and trim wherever practical.
- Inspect both sides. Photograph the face, reverse, seam intersection, starts and ends, and any repaired area.
- Check function. Stretch openings and load stress points in a way that reflects dressing and wear.
- Wash and recheck. Use the agreed care procedure, then review smoothness, twist, holes, breakage, measurements, and recovery.
- Seal the reference. Keep the approved sample and current tech-pack revision available for bulk inspection.
Common warning signs during sample review
| Warning sign | What it may indicate | What to request next |
|---|---|---|
| Tech pack shows exterior views only | Inside construction is open to interpretation | Inside photos or seam cross-sections by location |
| Stretch seam makes a cracking sound | Insufficient extension, broken thread, or damaged fabric | Open the area for inspection and repeat on production-intent fabric |
| Needle holes appear beside stitching | Needle, machine, speed, or fabric compatibility issue | Washed samples from corrected sewing trials |
| Hem tunnels or waves | Tension, feeding, stitch density, or fold control issue | Flat measurements and corrected face/reverse samples |
| Pocket corner pulls away | Load path or reinforcement is inadequate | Revised reinforcement position and functional review |
| Comments say “improve stitching” | The defect and acceptance standard are unclear | Marked photograph, location, limit, and required correction |
What to include in the RFQ and tech pack
- Garment type, target fit, size range, and end use
- Body fabric and trim construction, composition, weight, finish, and stretch direction
- Seam map covering every join, opening, hem, pocket, and stress point
- Required face and reverse appearance with reference photos or cross-sections
- Seam allowance, finished width, stitch density, thread color, and visible topstitch spacing
- Needle and thread performance requirements where material sensitivity matters
- Stretch, seam performance, comfort, laundering, and appearance test plan
- Reinforcement location, size, orientation, and color
- Sample stages, approval owner, and retained reference requirements
- Order quantity, color and size breakdown, packaging, and target delivery window
Yinuo Apparel’s quality approach provides additional context for turning the specification into inspection points. Keep the RFQ focused on the finished result and ask the supplier to flag any construction that needs a material trial before quotation is finalized.
Build an approval standard the factory can repeat
Good knit apparel seam construction is not defined by the most complicated stitch or the highest stitch count. It is the combination that joins the selected materials, follows the required stretch, feels appropriate in wear, survives the agreed care process, and remains repeatable in bulk production.
Preparing a knit apparel program? Send Yinuo Apparel your tech pack, fabric specification, seam references, size range, order quantity, color plan, test requirements, and delivery target. We can identify open construction decisions and define the sample evidence needed before bulk approval.