
Critical, major and minor garment defects should be classified by consequence, not by how dramatic a flaw looks. A critical defect presents a serious safety, legal or prohibited-product risk that requires immediate escalation. A major defect is likely to impair function, fit, saleability or a prominent appearance requirement. A minor defect departs from the approved workmanship standard without materially reducing normal use.
Those descriptions are a starting framework, not a universal defect list. The buyer’s approved specification, product use, destination-market requirements, defect location and agreed inspection plan control the final classification. A loose component on one product may be cosmetic; on another it may create a safety concern. Buyers should therefore approve examples and boundary conditions before bulk inspection begins.
What do critical, major and minor mean?
Defect severity describes the potential consequence of releasing the affected unit. It is not a measure of how expensive the repair is, how often the issue occurred or who caused it. Keep those questions separate so inspectors do not downgrade a serious issue merely because it is easy to fix.
| Classification | Practical buyer meaning | Typical response |
|---|---|---|
| Critical | A condition that may create a serious safety, regulatory or prohibited-product risk. | Stop, isolate affected goods and escalate to the buyer’s qualified quality or compliance owner. |
| Major | A condition likely to impair intended function, fit, durability, saleability or a prominent approved appearance. | Count against the agreed major-defect limit; contain, investigate and define correction or disposition. |
| Minor | A workmanship or appearance departure that does not materially impair normal use but still misses the approved standard. | Count against the agreed minor-defect limit and monitor whether repetition indicates a process problem. |
A unit can contain more than one defect, and the same physical issue should not be counted twice under different severity classes unless the inspection procedure explicitly requires separate observations. Define the counting rule in advance. The broader garment quality-control framework should also state where material, construction, measurement, appearance and packing checks occur.
Why the same garment defect can change classification
Classification depends on context. Inspectors need more than a defect name such as “stitching,” “stain” or “measurement.” They need the affected feature, location, extent, product use and approved requirement.
- Location: a small mark on an inside seam allowance differs from the same mark on the front chest.
- Function: a skipped stitch that does not open a seam differs from an opening along a load-bearing or high-movement seam.
- Extent: one short loose thread differs from repeated untrimmed threads across the garment.
- Product and user: detachable parts, drawcords or trims can carry different risks depending on the garment category and intended wearer.
- Market requirement: mandatory labeling, restricted substances and product-safety rules vary by destination and product type; qualified owners must confirm them.
- Approved reference: a visible variation may be acceptable if it matches the signed sample and specification, or defective if it falls outside them.
Do not use classification to rewrite the standard after production. If the requirement is unclear, record the item as pending buyer disposition and keep the affected quantity isolated rather than forcing an unsupported category.
Use a consequence-first classification method
A repeatable decision sequence helps different inspectors reach the same conclusion.
- Identify the controlled requirement. Cite the drawing, measurement chart, approved sample, artwork, label file, packing instruction or applicable requirement.
- Describe the observed condition. Record what is physically present without assigning blame or using vague language such as “bad quality.”
- Assess the consequence. Ask whether the condition affects safety or compliance, intended function, fit, durability, saleability or only a limited appearance detail.
- Add the boundary conditions. State the location, size, quantity, visibility, recurrence and affected color or size.
- Assign the agreed class. Use the approved defect library; escalate any condition that the library does not cover.
- Apply the inspection rule. Count the defect in the correct class and keep acceptance, rework and release decisions within their defined authority.
Measurement variation needs the same discipline. Compare the recorded point of measure with the current chart and the agreed garment measurement tolerance. A number outside tolerance is an observation; its severity still depends on the effect on fit, function and the buyer’s approved classification rule.
Illustrative garment defect examples
The examples below show how buyers can structure a defect library. They are illustrative only and are not a substitute for product-specific safety, legal or inspection requirements.
| Observed condition | Possible starting class | What could change the class? |
|---|---|---|
| Sharp metal fragment or other hazardous foreign object | Critical; immediate escalation | Qualified investigation and applicable product-safety requirements control the response. |
| Open seam that exposes the body or prevents normal wear | Major | Seam location, opening length, product use and whether the defect can propagate. |
| Wrong functional component or a closure that does not operate | Major | Whether the component is decorative, essential to use or safety-related. |
| Prominent oil mark, hole or shade panel on the visible garment face | Major | Size, location, color contrast, cleanability and approved appearance standard. |
| Small skipped stitch in a non-stressed, inconspicuous area | Minor or major | Whether the seam can open, the defect repeats and the construction specification. |
| Short untrimmed thread with no seam damage | Minor | Location, frequency, snag risk and whether trimming can damage the garment. |
| Small print or embroidery placement variation | Minor or major | Approved tolerance, visibility, branding impact and whether artwork is distorted. |
| Incorrect mandatory product information | Escalate; may be critical or major | Destination law, product category and advice from the responsible compliance owner. |
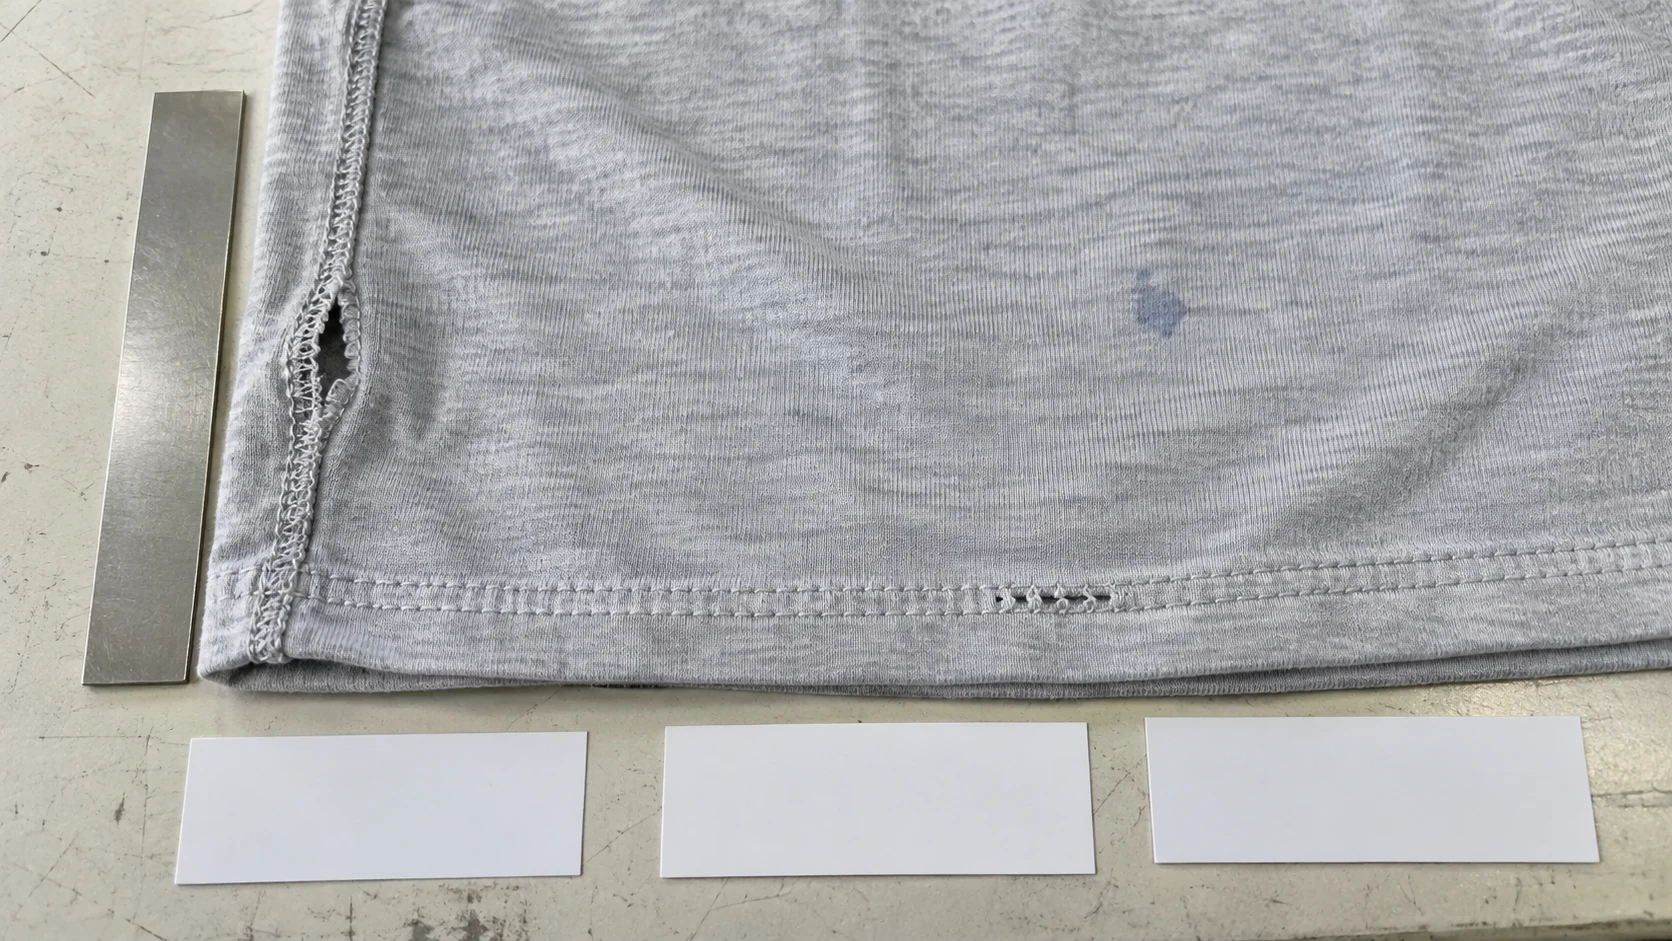
Construction terms also need precision. An “open seam” may come from missing stitches, seam slippage, broken thread or inadequate seam allowance, and the corrective action differs. Use the knit apparel seam construction guide to connect the visible condition with the approved stitch and seam requirement.
Build a product-specific defect library
A useful defect library is a controlled agreement, not a gallery of random inspection photos. Build it during development and update it when the product, material, artwork or destination changes.
- Defect name and plain description.
- Applicable style, component, color or size.
- Exact location and visibility rule.
- Severity class with the reason for that class.
- Maximum size, length or other boundary where a measurable limit is appropriate.
- One acceptable boundary image and one reject image, taken at comparable scale and lighting.
- Approved specification, sample or requirement that supports the decision.
- Counting rule when several occurrences appear on one unit.
- Escalation owner for conditions outside the library.
- Revision number, approval date and approver.
Connect the visual library to the current golden sample and controlled production specification. A photograph alone may hide texture, stretch, hand feel, exact color or three-dimensional fit, so retain the physical reference when those qualities matter.
Calibrate inspectors before the inspection
Classification fails when the buyer, factory quality team and third-party inspector apply different boundaries. Hold a short calibration review before the first formal inspection or when a new recurring condition appears.
- Review the latest defect-library revision and approved samples.
- Compare borderline examples, not only obvious failures.
- Confirm how multiple defects on one unit are counted.
- Identify which conditions require immediate line containment.
- Name who can approve repair, concession, replacement or rejection.
- Record unresolved examples and the deadline for buyer disposition.
Calibration should produce a dated record. If inspectors disagree, document the final decision and add the example to the library. That creates a reusable boundary instead of repeating the same debate during every shipment.
Classification is not the same as acceptance
Critical, major and minor are severity classes. The decision to accept or reject an inspected lot uses the sampling plan and acceptance criteria agreed for that order. Do not invent those limits during inspection, and do not assume that calling a defect “minor” makes the affected unit acceptable.
Also keep three other decisions separate:
- Disposition: whether affected goods will be repaired, replaced, accepted under an authorized concession or rejected.
- Root cause: why the condition occurred and which process allowed it to continue.
- Release: who verifies correction and authorizes the quantity to move to packing or shipment.
The production status report should show affected, contained, reworked, reinspected and accepted quantities separately. That prevents repaired output from being treated as shipment-ready before verification closes.
What evidence should an inspection photo include?
A useful defect photo should let another reviewer identify the order, garment area and scale without guessing. Take one context view of the garment and one close view of the condition. Include a ruler or scale where dimensions matter, keep color and lighting reasonably neutral, and avoid covering the defect with an annotation.
The report should record the style, color, size, unit or carton reference, inspection date, defect location, observed quantity and assigned class. Protect unrelated customer information and do not reuse a photograph from another order merely because the defect looks similar.
Common classification failures
- Every visible flaw is major. This removes the distinction needed for consistent counting and corrective priorities.
- Critical issues are decided by appearance alone. Safety and compliance questions need qualified escalation.
- Defect names lack boundaries. “Uneven stitching” means little without location, extent and reference.
- Photos lack context or scale. The buyer cannot verify where the condition sits or how large it is.
- Repaired units bypass reinspection. Correction does not prove the unit now meets the requirement.
- The library is not version-controlled. Inspectors apply different standards to the same production lot.
- Severity is confused with root cause. A simple cause can still create a serious product consequence.
Frequently asked questions
Is a critical defect always an automatic lot rejection?
The approved inspection plan controls the formal lot decision, but a suspected critical condition should trigger immediate isolation and qualified escalation. Do not release affected or potentially affected goods while the scope and required response remain unresolved.
Can a cosmetic defect be major?
Yes. A prominent appearance defect can materially affect saleability or the approved brand presentation even when garment function remains intact. Location, contrast, size and the signed appearance standard determine the boundary.
Should repeated minor defects be upgraded to major?
Do not change the severity class merely to force a result. Count the defects under the agreed rule and separately escalate the repeated pattern as a process risk. If repetition changes product use, appearance or saleability, the buyer should document a revised classification rule for the affected condition.
Who should approve the defect list?
The buyer’s responsible product, quality and compliance owners should approve the parts within their authority, with factory and inspection teams confirming that the definitions are observable and countable. Safety or legal questions should go to appropriately qualified specialists.
Create the defect list before bulk inspection
Define critical, major and minor garment defects while the product specification and samples are still being approved. For a practical review, send Yinuo Apparel your style list, current tech pack, destination market, intended user, inspection scope, approved samples and known quality concerns. The resulting defect library should give every reviewer the same definitions, evidence requirements, escalation path and revision.