

Check suspected needle damage on production-intent knit garments by inspecting the fabric beside each relevant stitch line, recording the location, and comparing representative samples before and after the agreed care procedure. If holes or broken fabric yarns appear, keep approval of that construction open until a corrected sewing trial has been reviewed. A neat seam photograph alone does not close the issue.
A buyer’s first concern may be a small opening next to a sleeve seam or a hem that develops holes after care. The useful response is to identify what failed, connect it to the material and sewing operation, and request evidence for a correction. This guide focuses on that approval decision, rather than prescribing machine settings for every T-shirt or hoodie.
Needle damage concerns the fabric, not only the sewing thread
In its technical bulletin on reducing needle cutting, American & Efird describes needle cutting as fabric yarns breaking when the needle enters. Because knit fabric is built from interlinked loops, a damaged yarn can lead to a run near the seam. The term should not become a catch-all label for every poor-looking stitch.
Separate the visible observation from the proposed cause. A marked photo can show an opening beside stitching, but it may not show whether the yarn was cut, abraded, damaged earlier or affected by another process. Record “suspected fabric damage at sleeve seam,” for example, until the supplier’s investigation supports a more specific diagnosis.
| What the buyer observes | What to distinguish | Next evidence to request |
|---|---|---|
| Holes or disrupted knit loops beside stitches | Fabric damage rather than a sewing-thread-only failure. | Face and reverse detail, exact location, material identity and a sewing trial. |
| Gaps in an otherwise intact stitch sequence | Possible skipped stitches. | Stitch-formation review and a corrected sample from that operation. |
| Sewing thread breaks during the agreed extension check | Thread or seam performance, with the surrounding fabric inspected separately. | Documented check conditions and the observed failure mode. |
| Panels pull apart enough to expose joining threads | Seam opening or grin, not automatic proof of cut fabric yarns. | Relaxed and agreed loaded views, plus the intended seam reference. |
Groz-Beckert’s sewing troubleshooting guidance treats skipped stitches as a stitch-formation problem involving loop pickup, distinct from material damage. Several issues can coexist, so inspect the fabric and the sewing threads rather than choosing one label from a distant photograph.
Map the concern to a garment location and sample
Start with the approved knit-apparel seam construction. Identify the operation and material layers: sleeve joining, side seam, rib attachment, hem, pocket or reinforcement. An acceptable joining seam does not automatically establish that a denser reinforcement or a different hem operation is acceptable.
Give each sample a traceable identity: style, size, color, fabric lot, sample stage and relevant specification revision. Confirm whether it uses the intended fabric finish and production route. Keep a whole-garment view with the location marked, then photograph the seam face, reverse and adjacent cloth.
Include the condition in which the concern was found: newly sewn, after finishing, after washing or during an agreed movement check. Note whether holes follow the needle line or occur elsewhere. American & Efird cautions that some damage attributed to needle cutting originates before sewing or during handling; its position is therefore an important investigation clue, not a verdict.
Look beside the seam without forcing a failure
Inspect the relaxed area under lighting that makes the fabric structure visible. Do not let the overlock allowance hide the cloth next to the stitch line. A useful close-up includes both the stitches and their surrounding knit loops, while a wider photograph establishes where the detail sits on the garment.
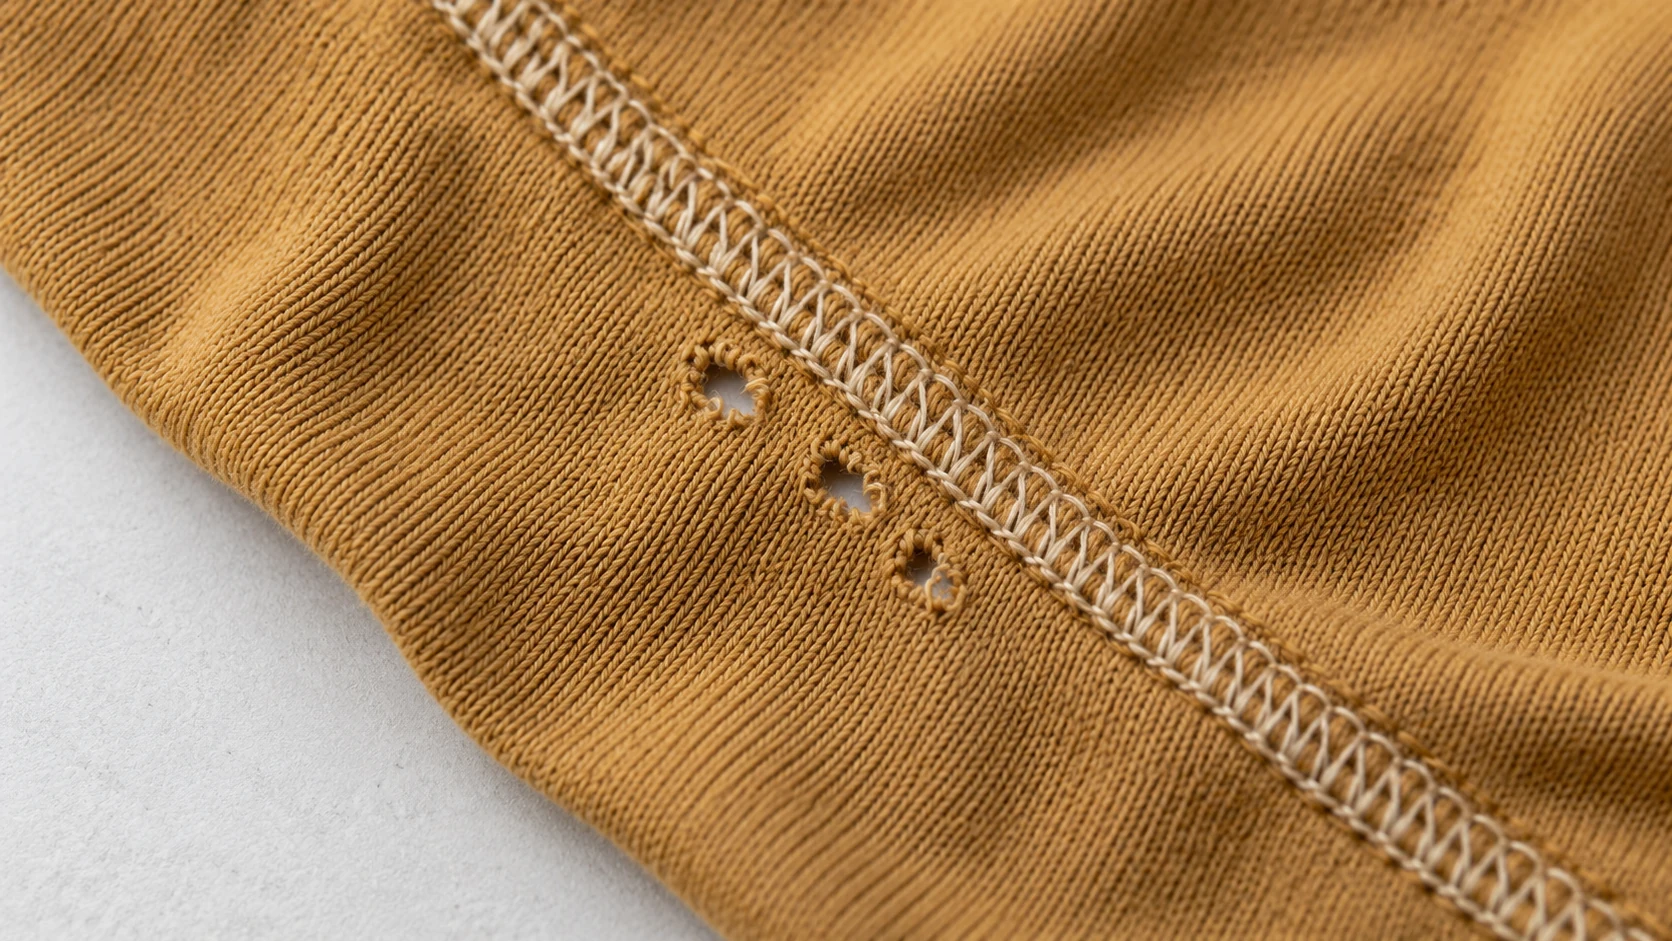
Groz-Beckert’s needle-selection guidance describes slight pulling and shearing during a seam trial to reveal material damage. For buyer review, agree the handling with the supplier or laboratory. Avoid an uncontrolled hard pull that creates new damage and then gets reported as an original sewing defect.
If a formal performance result is required, ask the laboratory to identify the applicable method, specimen preparation, direction and acceptance criteria. A buyer’s visual screening photograph is not a laboratory strength result. Record the two types of evidence separately.
A smaller needle is a trial option, not the whole correction
The supplier’s technician should select the needle system for the machine and operation, then evaluate point style, size and thread compatibility on the actual material. The same Groz-Beckert selection guide links these choices to seam trials. Do not insert one metric needle size into every garment order solely because both fabrics are called jersey.
Ask what else was checked. Groz-Beckert’s troubleshooting guidance identifies needle wear, damaged feeding or plate surfaces, sewing speed and fabric quality as possible contributors to material damage. This supports a wider investigation; it does not mean each factor is responsible in your sample.
Request a short trial record rather than a message saying “needle changed.” It should identify the original concern, the proposed cause, what changed and which samples were made. Where practical, controlled comparisons help the technician explain the effect of a change. If several settings or materials changed together, record that combination honestly.
Keep appearance and function in the same decision. A revision that removes visible holes still needs to meet the intended seam construction and performance requirements. Changing the fabric, thread, seam width or reinforcement may also reopen other parts of the specification.
Compare the corrected sample before and after care
Agree the wash and drying procedure, cycle count, sample coverage and review criteria before judging the corrected trial. Use the intended care instructions and buyer requirements. Retain an identifiable unwashed reference, and photograph the same locations on the cared-for samples.
Review the fabric next to the seam as well as the stitches. Record any new openings, runs, thread breakage or change in seam appearance. A post-care concern needs comparison with the baseline; it should not automatically be attributed to a needle without investigating the sewing and care history.
Link this review to garment shrinkage approval, but do not merge the decisions. Passing length and width measurements does not establish that the fabric beside the seam is sound. Likewise, a localized opening is not a measurement of overall shrinkage.
Close needle damage approval with an evidence record
Define the acceptance criteria and classify the observed defect against the buyer’s agreed specification. Use your garment defect-classification guide as a discussion framework, not as an automatic severity label for every hole. Keep the affected construction unapproved when required evidence or correction remains open.
- Sample IDs, fabric identity, seam location and specification revision.
- Marked whole-garment images plus face and reverse details.
- Investigation findings, technician’s changes and corrected trial IDs.
- Agreed handling or testing conditions and before-and-after care evidence.
- Approval decision, reviewer, date and changes that require another trial.
Retain the approved evidence within your golden-sample management system. Confirm how the supplier will check the relevant operation when bulk sewing starts. A corrected development sample provides a reference; it is not proof that every later garment has been inspected.
For a needle damage review with Yinuo Apparel, send the garment and fabric specifications, seam references, sample identities, marked photos, existing trial notes and intended care requirements. These inputs help the team discuss the material and sewing evidence needed before your project’s construction approval is closed.